Type Curve generators are standard in reservoir engineering workflows. They are also a bit problematic. They require lots of inputs, which are time-consuming to build and fill out. You can’t easily recreate them in other projects. Therefore, my next two posts will show you how to make type curve inputs more efficient. The first post will demonstrate how to populate type curve inputs with IronPython and toggle between different sets of inputs. The second post will go further by allowing users to load type curve settings in a table. Then, the user tells an R function which row to pull from the table and place in the type curve inputs. Read on for these great solutions!
Let’s start off by looking at the type curve inputs for 2 projects I’ve worked with.
Type Curve Input Examples
In this project, I created 48 input property controls so users could run up to 3 different type curves.
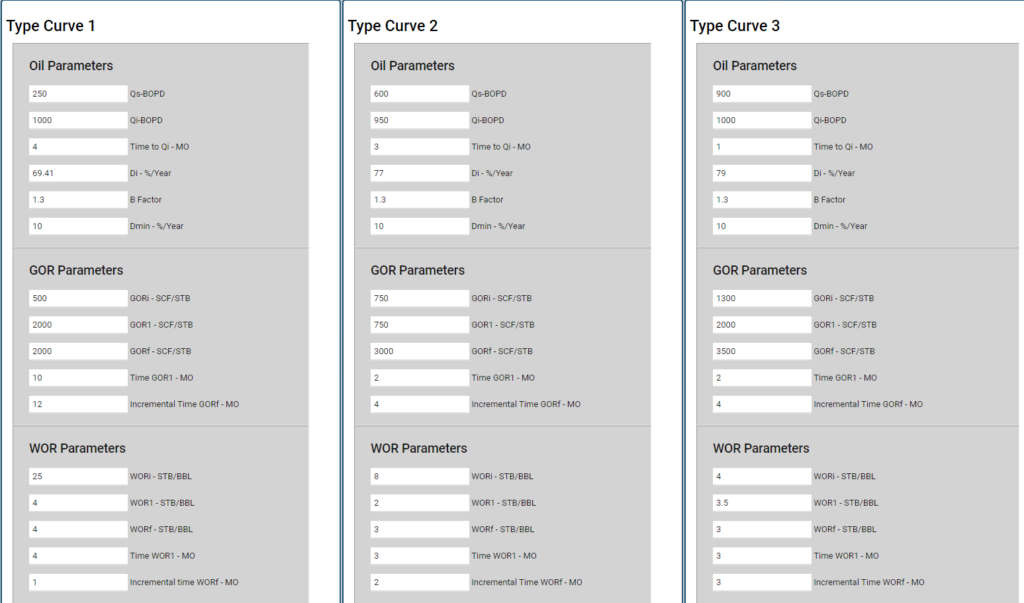
This second example is from my coworker, David Peach. He’s working on a type curve project right now and hit me up to brainstorm on how we could make entering type curve inputs more automated, which is how these two solutions came about. Here are his inputs.
Now, let’s talk about David’s specific use case.
Use Case No 1
David’s users will have a few different sets of type curve parameters. They need to toggle between them easily without hand keying them over and over. They also want to be able to update them easily.
Now, what I am showing in today’s post meets the first requirement (toggle easily). Next week’s post will meet the second requirement (switch easily). So, let’s look at how to make type curve inputs more efficient.
High-Level Steps
For the purpose of this post, I used a blank project with one set of property controls. After the first set of controls, it’s just copying and pasting.
The screenshot below shows the end result. The high-level steps are as follows.
- Create drop-down property control.
- Create input property controls.
- Attach the script to drop-down property control.
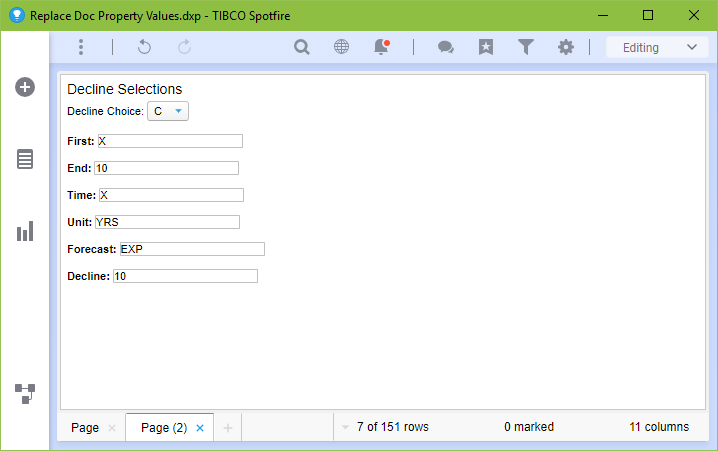
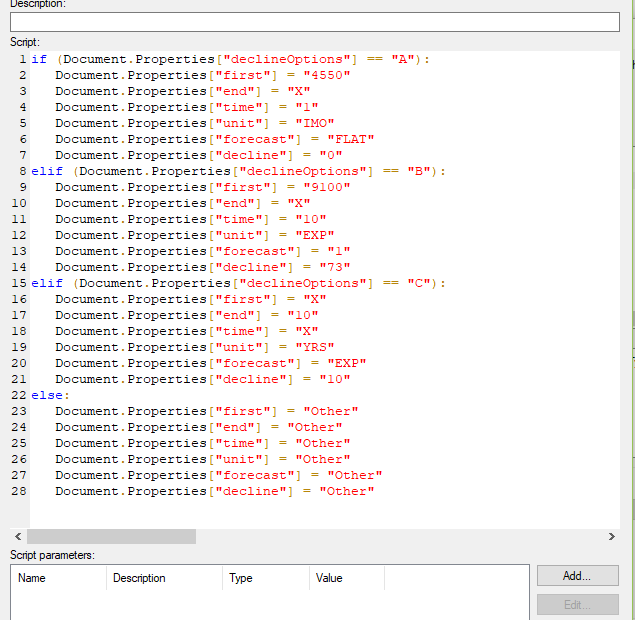
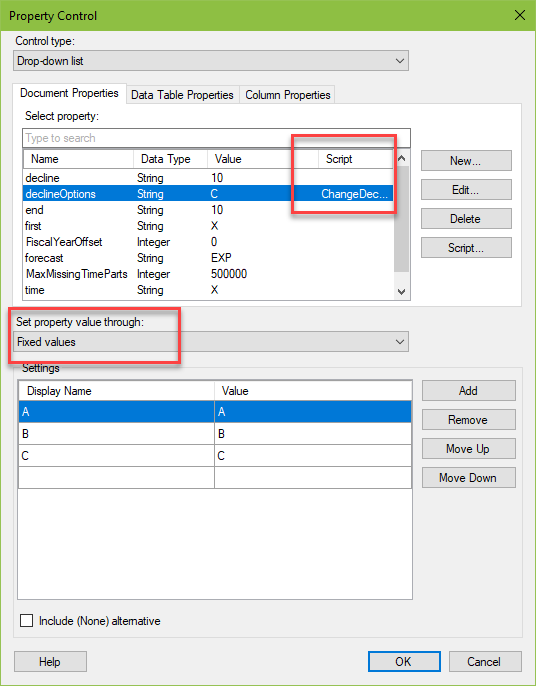
Here’s the solution from the Edit HTML view. The drop-down property control is called declineOption. I named the other inputs first, end, time, unit, forecast, and decline.
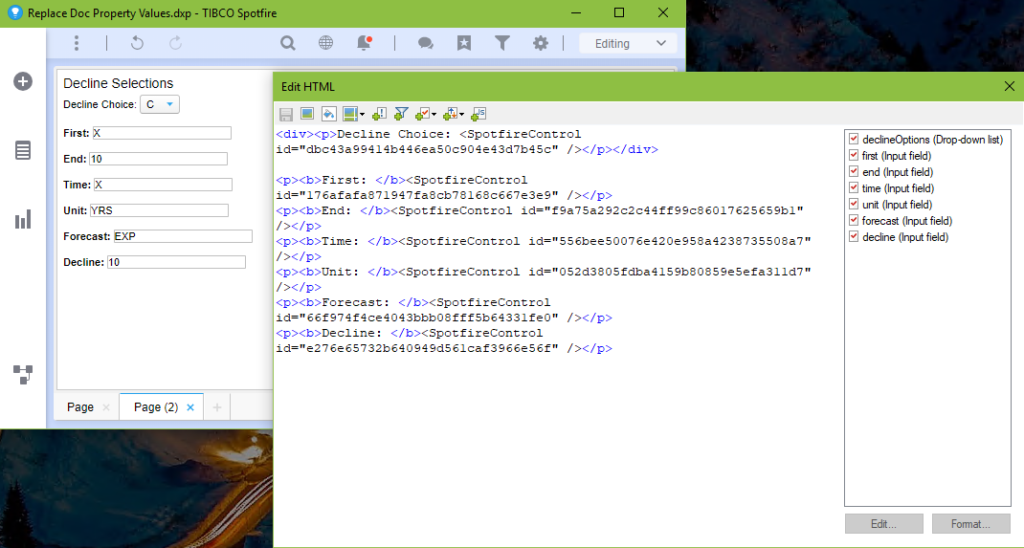
As you can see here, the IronPython script is attached to the declineOptions drop-down property control, which is set up with Fixed values. Anytime the drop-down changes, the document properties will update. Also note, for this particular use case, all of my input property controls are string data types.
Code Snippet
Here is the code to populate document properties with IronPython. It uses a simple if and elif that looks at the drop-down and then decides how to populate each document property. Because all of my inputs are strings, I have quotes around all the values. If your use case requires real or integers, omit the quotes.
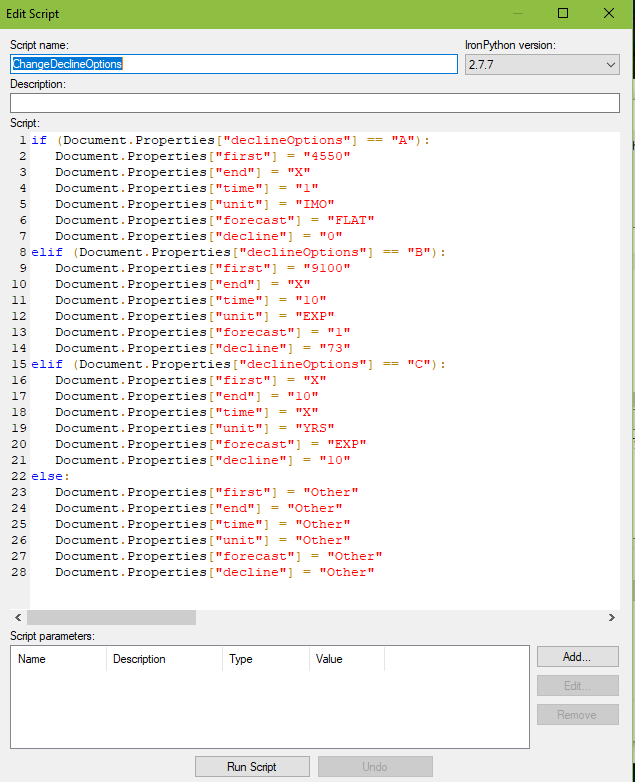
And here is code for easy copy and paste.
if (Document.Properties["declineOptions"] == "A"):
   Document.Properties["first"] = "4550"
   Document.Properties["end"] = "X"
   Document.Properties["time"] = "1"
   Document.Properties["unit"] = "IMO"
   Document.Properties["forecast"] = "FLAT"
   Document.Properties["decline"] = "0"
elif (Document.Properties["declineOptions"] == "B"):
   Document.Properties["first"] = "9100"
   Document.Properties["end"] = "X"
   Document.Properties["time"] = "10"
   Document.Properties["unit"] = "EXP"
   Document.Properties["forecast"] = "1"
   Document.Properties["decline"] = "73"
elif (Document.Properties["declineOptions"] == "C"):
   Document.Properties["first"] = "X"
   Document.Properties["end"] = "10"
   Document.Properties["time"] = "X"
   Document.Properties["unit"] = "YRS"
   Document.Properties["forecast"] = "EXP"
   Document.Properties["decline"] = "10"
else:
   Document.Properties["first"] = "Other"
   Document.Properties["end"] = "Other"
   Document.Properties["time"] = "Other"
   Document.Properties["unit"] = "Other"
   Document.Properties["forecast"] = "Other"
   Document.Properties["decline"] = "Other"
Because I like to be thorough, detailed steps are shown below.
Details Steps
Setup the Drop-Down
- Add a text area to a page.
- Right-click and select Edit HTML.
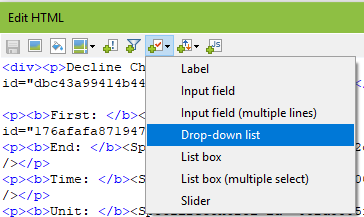
- Click the add property control button and select the drop-down property control.
- Click the New button to create a new drop-down. Name it and set the data type as desired. Don’t enter a value. Click OK.
- Under Set property value through: choose Fixed Values.
- In Display Name, enter the values you want to appear in the drop-down. Under Value, enter the value you will use in the IronPython code. They can be the same, but they don’t have to be.
- Click OK to exit.
Setup the Inputs
- Click the add property control button and select the input property control.
- Click the New button to create a new drop-down. Name it and set the data type as desired. In my example, the data type was string. Enter any value. Click OK.
- Click OK to exit and repeat these steps for each input property. NOTE: Input properties must be created one at a time. You may click New again and create another one, but when you go back to the text area, you will find only one input.
Modify the Code
- Copy the code snippet in this post.
- From within the Edit HTML dialog, click on the drop-down property control on the right-hand side of the text area and click Edit.
- Click on the drop-down property control if it is not already selected and click the Script button.
- Set the radio button to Execute the script selected below:
- Click the New button.
- Name the script. Paste in the code. Modify the code to use your property control names and values.
- Click Run Script to ensure there are no errors. Click OK to exit.
- Test that the drop-down changes the document property values.
Wrap Up
In conclusion, you should now know how to populate document properties with IronPython with will make your type curve inputs more efficient. Next week, I will show you a solution that loads type curve inputs into a table and then uses a drop-down property control to select which row of inputs should be placed into the document properties. This can further help automate your reservoir engineering workflows.
Spotfire Version
Content created with Spotfire 10.2.
If You Enjoyed This
Check out some of my other IronPython posts.
Pingback: Select Type Curve Inputs with Property Controls » The Analytics Corner
Do you have any content on creating the actual type curve? thanks
You can find that information here — https://datashoptalk.com/arps-type-curve-in-spotfire-in-20-minutes/
Julie, would you happen to know if there is an alternative to the site you gave? That site seems to either not exist anymore or it has an issue. Thanks.
Which site or link are you referring to? I reread the post and don’t an external site reference.
Hi Julie,
I believe the site TY is referencing is the following:
https://datashoptalk.com/arps-type-curve-in-spotfire-in-20-minutes/
This link does not appear to work for me either. Would you happen to know of an alternative to this link?
Thanks for your help.
All of the Data Shop Talk content is gone. Petro.ai deleted it. They owned the blog.
Pingback: How to Use Input Property Controls in Spotfire Text Areas » The Analytics Corner
Can you share the spotfire dashboard that houses this code/example?
Sorry I can’t share that.