I started a new role in October with our RPA (Robotic Process Automation) team, which involves working with Microsoft Power Automate and Power Automate Desktop (and still Alteryx). I’ve been learning the ropes the last few months and want to show an example of how you can use these tools to automate small but mundane tasks, like extracting a value from email and updating an Excel spreadsheet. This post will explain how to update an Excel file with Power Automate Desktop.
Use Case
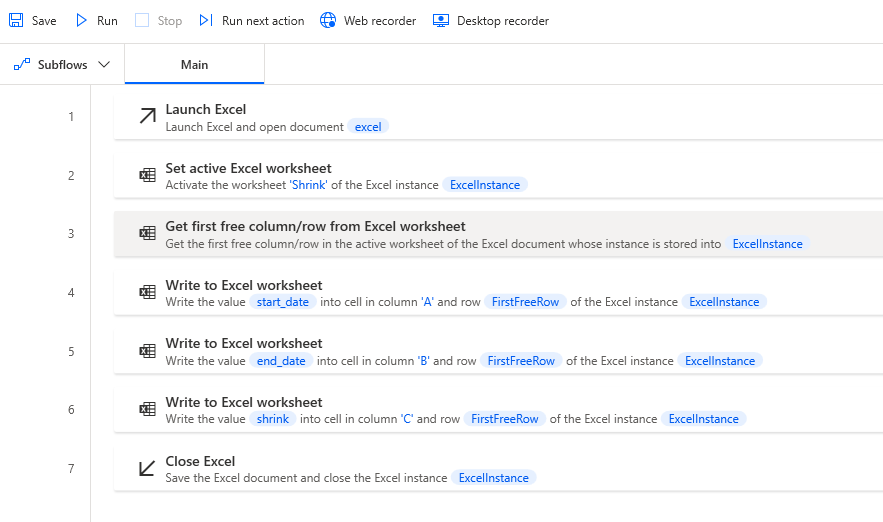
First, know that this Power Automate Desktop flow (PAD) is part of a Power Automate (PA) flow. I use Power Automate to trigger the desktop flow. To keep the post a reasonable length, I’m will cover just the PAD portion. In a future post, I’ll showcase the PA piece. Here is my full use case.
- A user receives an email (approximately once a month) to update a value in a spreadsheet. The email contains a start date, end date, and “shrink” value.
- PA monitors the inbox and triggers the flow when it recognizes the email by a specific subject line.
- PA parses the email and extracts the start date, end date, and shrink value.
- Then, PA triggers the desktop flow shown below to populate the spreadsheet with the values from the email.
The Flow Actions
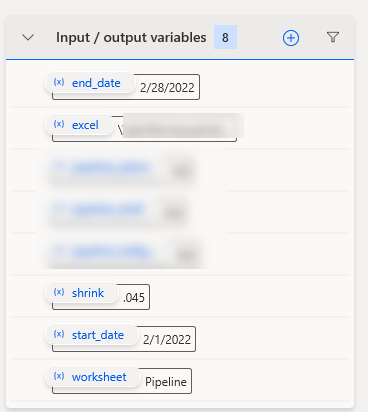
To support this flow, I set up 5 input variables. Don’t worry about the blurry ones. I have since made the flow do a few extra things, but I want to keep this use case simple, so I blurred out the input variables that don’t apply. PA transfers the values from the PA flow (where they were extracted from the email) into the PAD flow via the input variables. PAD updates the Excel file. The excel input variable is the location of the file on our shared drive.
Detailed Steps
Step 1
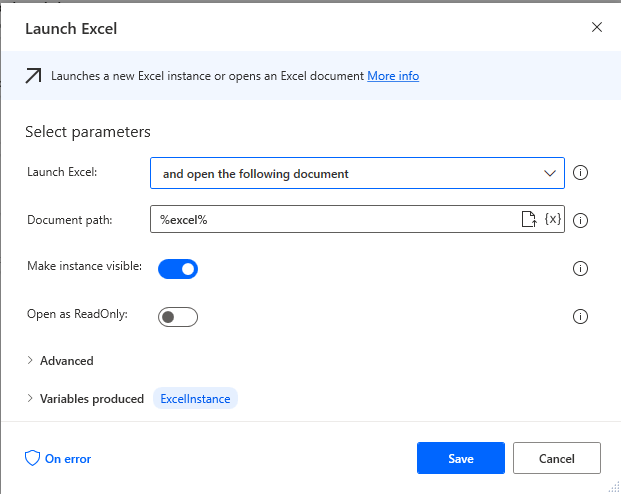
First, PAD opens the excel file using the file path stored in the excel input variable. This produces a flow variable called ExcelInstance, which is referenced in other actions.
Step 2
To put the data in the right place, PAD sets the active worksheet to a worksheet specified with the input variable worksheet.

Step 3
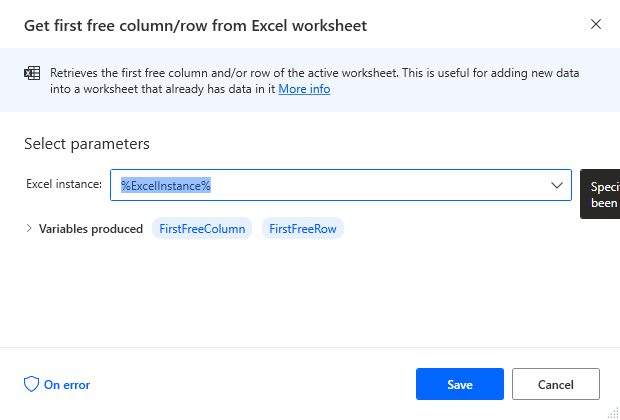
Next, PAD finds the first free column and row. Free row means the first blank row. This is important because I always want to append to the existing data set. This action produces an output variable called FirstFreeRow that I will reference in future actions.
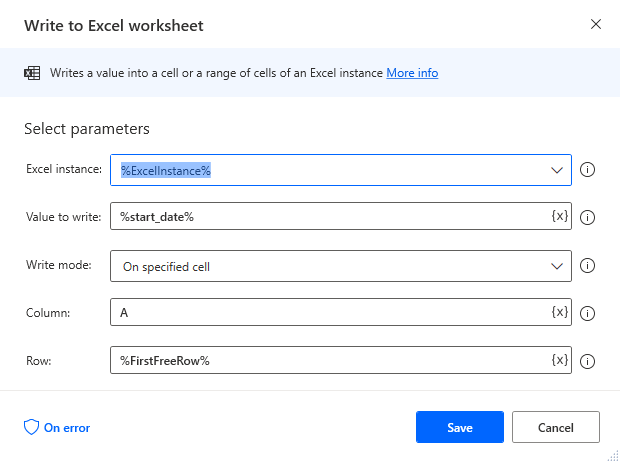
Steps 4, 5, 6 (Updating start date, end date, and shrink)
Now, I start writing to the Excel file using my input variables (start date, end date, shrink) and the flow variable FirstFreeRow. Also note, the flow variable ExcelInstance gets referenced here. I hard code the column because it will not change and use the FirstFreeRow flow variable to specify the row.
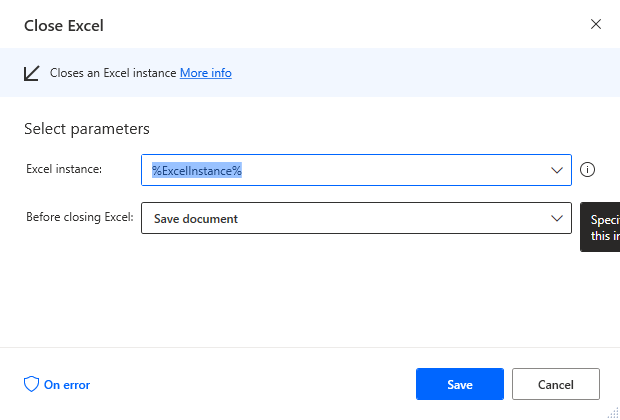
Steps 7
Finally, I use the Close Excel action to close the instance of Excel and save the document.
Conclusion
And that’s how I updated an Excel spreadsheet with information from an email. I particularly like this solution because it’s dynamic. I am not hard coding both the row and the column. So many of the posts I found on the internet were just hardcoded, which seems useless to me.
In conclusion, now you know how to update an Excel file with Power Automate Desktop. I’ll show the PA piece where I extract the data from the email in a future post.
Other Sweet Microsoft Content
- Managing Analytics Assets with ADO (why analytics need ADO)
- Azure DevOps Terminology and Structure (so you know what we are talking about)
- Questions to Ask and Answer Before Configuring DevOps (so you don’t have rework like I did)
- Configuring Azure DevOps (configuring the organization, team, area path, iteration
- Clone Processes to Unlock Customization in DevOps (working with processes)
Pingback: How to Convert XLS to XLSX with Power Automate Desktop » The Analytics Corner
Pingback: Getting Oriented with Power Automate » The Analytics Corner
Need to update and/or create many rows in Excel?
Try Excel batch actions in Power Automate:
https://powerusers.microsoft.com/t5/Power-Automate-Cookbook/Excel-Batch-Create-Update-and-Upsert/td-p/1624706
Demo Video:
https://youtu.be/HiEU34Ix5gA
Hey there, I see that you are a prolific author in the Power Automate Gallery. Thanks for noticing my work. Would you mind giving me some feedback on my Learning Power Automate series?
Pingback: How To Search PDFs for Keywords in Power Automate Desktop » The Analytics Corner