A while ago, I started a series on learning the Spotfire expression language. I made a lot of progress on it but got pulled off on a few side quests. This week, I return to that theme with an explanation of how to use the $esc and $map functions in Spotfire. Knowing how to use these functions will allow you to connect visualizations to property control to provide a more interactive experience for users. It will also give you greater insight into how Spotfire expressions really work. Read on if you want to be able to…
- Create dynamic visualizations that update with changes to property controls.
- Use data limiting with property controls.
Blog or Video
Despite my best efforts, WordPress will just not embed the video, so please copy and paste the link to get to the 8 minute video..
On to the post!
$esc function
In simple terms, the $esc function puts square brackets around a string so that Spotfire reads a string as a column name. For example….
String value: FIELD
Expression: $esc{FIELD}
Result: [FIELD]
String values are commonly passed thru property controls. Here’s another example. Let’s say you have a list box property control called “ListBox”. The list box populates with names of columns from your data table. The $esc function puts square brackets around the string value passed from the list box property control.
Expression: $esc(${Listbox})
Result: [FIELD]
I’ll get into dynamic examples in just a second, but next let’s look at the $map function. It is often used in conjunction with $esc.
$map function
The purpose of the $map function is to create a template, into which multiple values can be passed and processed. This is handy when you are using property controls like the list box multi-select or the input multiple lines. With these types of controls, users make more than one selection, so you must tell Spotfire what to do with each one.
In the example below, I have a list box multi-select property control called “ListBoxMultiSelect”. You now know the $esc function places square brackets around string values to turn them into columns. The $map function creates a template. The first part of the template is the Sum aggregation. The second part is the value fed from the property control. The third part is a single comma. The comma separates multiple values selected in the property control to get the result shown. Users select multiple values from a property control, and the $map template updates the expression on the y-axis to make the visualization dynamic.
Expression: $map("Sum($esc{${ListBoxMultiSelect})", ",")
Result: Sum([FIELD]), Sum([OPERATOR])
Now that you have the general idea, let me show you two practical examples.
Example 1 – Select Columns on Y Axis
Watch these two super short videos for demonstrations of using $esc and $map with list box, list box multi select, and drop down property controls.
Before I move on to the next example, I just want to point out that in these videos, I use the right-click option to set from property. However, depending on which axis you are working on or the property control type, set from property might not give you the right syntax. That’s why I am explaining what each of these functions does so you can manually enter the correct syntax when needed. For the purpose of example, using right-click was faster than typing it in. In the next example, you’ll have to modify the expression yourself. Spotfire won’t help on this one.
Example 2 – Limit Data with Property Controls
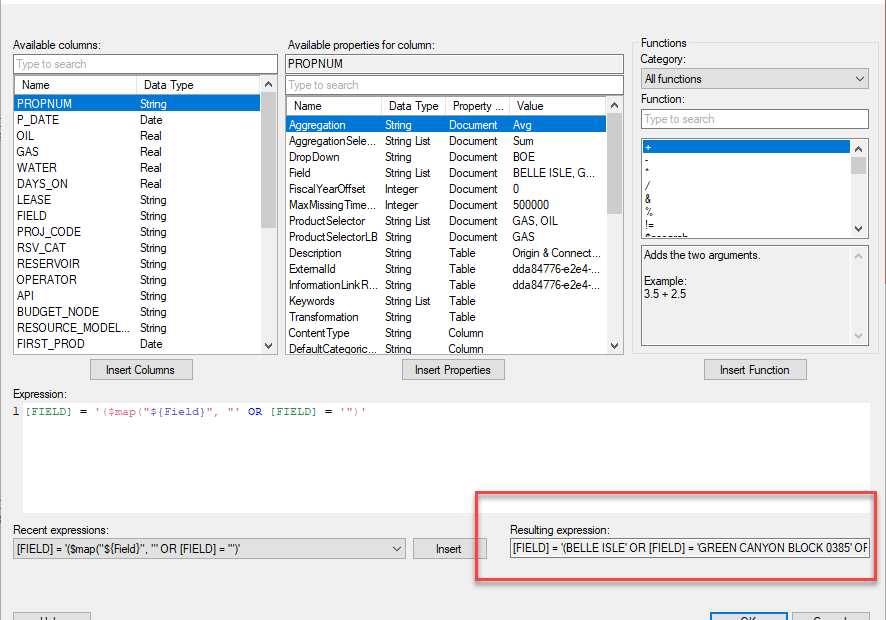
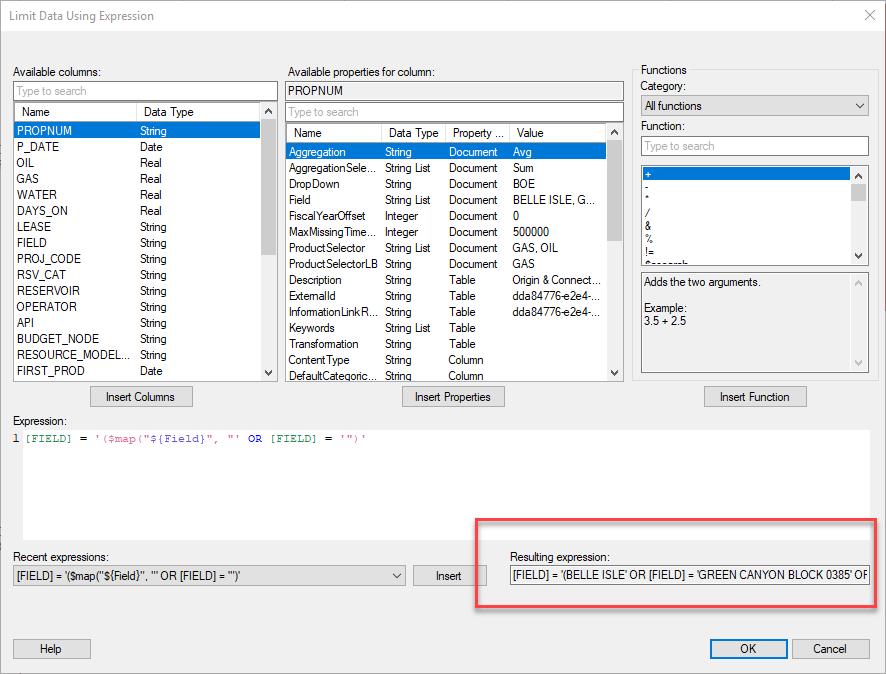
This example is a little bit more complicated because the template is a bit more complicated. I want to use a list box multi-select property control with data limiting. Now, if I were not using a property control, my data limiting expression would look like this…
[FIELD] = 'BELLE ISLE' or [FIELD] = 'BRISCOE RANCH EAGLEFORD' or [FIELD] = 'GREEN CANYON'To get the equivalent connected to a property control, I will use the $map function. The $map function template feeds each value from the property control into an expression with the required “OR” keyword and all the necessary quotes for the values to be read as strings. The custom expression looks like this.
[FIELD] = '$map("${Field}", " ' OR [FIELD] = ' ")'This syntax differs from previous examples. In this use case, single quotes are placed before the $map function and at the very end. Double quotes are used around the property control name. There are also more quotes in the “template” part of the expression. The easiest way to understand what each set of quotes is doing is to remove them and then read the resulting error or view the result in the Resulting expression dialog. I go thru what each set of quotes is doing in the full-length video.
This more complex example really highlights what Spotfire is looking for when referencing columns and column values when they are passed in from property controls. Now you should be ready to use the $esc and $map functions in your own custom expressions.
ProTip!
Before I close the post, I want to offer one more tip that can help you troubleshoot when working with $esc and $map functions. You can always use the description box to see exactly how Spotfire is reading something. In the screenshot below, I have copied the expression into the description, and then below the title, I can see how Spotfire translates it. Super helpful!
Spotfire Version
Content created with Spotfire 10.3.
Pingback: Limiting Data When Columns Change » The Analytics Corner
Pingback: How To Create Drop Downs in Spotfire Text Areas » The Analytics Corner
Pingback: How to Use List Box (multiple select) in Spotfire Text Areas » The Analytics Corner
Pingback: Using Label Property Controls in Spotfire » The Analytics Corner
Pingback: The Danger of Hiding Data in Spotfire » The Analytics Corner
Super powerful content without any marketing gimmicks.
Started with Spotfire (6,7) then to Qlik then to Power BI now converting some Spotfire to Power BI also use Power Automate.
Plan to read all your blogs posts and watch videos this 2023 MLK weekend!
That is awesome! Thanks for reading and I’m really glad the content is helpful.