After 5 years of blogging about Spotfire, I’ve written very little about using property controls, which is a shame because they are one of Spotfire’s best features. It’s time to fix that with a 7 part series on how to create each of the different types of property controls. This week, we’ll start with what is perhaps the most used property control, the dropdown. Read on to learn how to create drop downs in Spotfire text areas.
Blog or Video
When I first started learning Spotfire, I took TIBCO’s Spotfire Essentials I and II courses online. Then, I waited 6 months before taking Advanced Configurations, the course that taught you how to use property controls. I could not believe I wasted so much time not knowing how to use property controls because they are awesome.

If you aren’t familiar with property controls, prepare to have your mind blown. In my opinion, they are what makes Spotfire a better tool than PowerBI because they give so much power and flexibility to the user, even users who have no idea how to create property controls. So, let me show you how to create a basic dropdown property control.
Creating the Property Control
Follow the following steps to create a drop down property control.
- First, add a Text Area to your page.
- Right-click on the Text Area and select Edit HTML. You can also select Edit Text Area, but once I learned to use HTML and avoid the GUI, I stopped using Edit Text Area.
- Click the Insert Property Control button.

- Then, select Drop-down list.
- Click the New button.
- Name the property control and set the data type for the data you are working with. I will name mine DropDown1.
- Don’t enter anything in the Value text box.
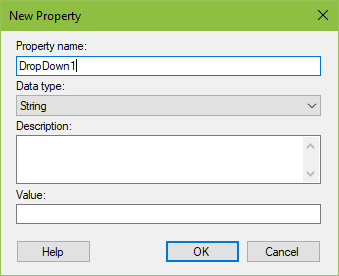
- Then, click Ok.
- In the Set property value through: drop-down, there are several options…(for this example, choose Column Selection)…
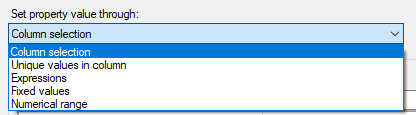
- Column selection – choose this if you want the drop-down to populate with a list of column names
- Unique values in column – choose this if you want the drop-down to populate with the unique values from one column
- Expressions – choose this if you want the drop-down to execute based on an expression
- Fixed values – choose this if you want the drop-down to populate based on text or numbers you enter rather than column names or unique values from column names
- Numerical range – not relevant for drop-down lists
- Spotfire defaults to putting all columns from a data table in the drop-down. If you don’t want all columns and want to pick specific columns, click the Select Columns button.
- Click the New button.
- Name the property. It must be a different name from the document property, and it cannot have spaces. I will name mine DropDown1Options. The data type should be boolean, and the Default value must be either True or False. This link explains the difference between setting it to True or False. I will set mine to False.
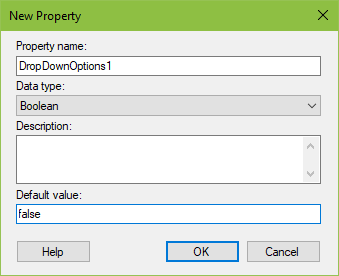
- NOTE: In this step, you create a column property. In step 5, you created a document property. A column property can be attached to more than one document property. A column can have more than one column property. Go to the Data menu, select Column Properties, and then select one of the columns in your drop-down, scroll to the bottom, and you will now see DropDwon1Options as a column property.

- NOTE: In this step, you create a column property. In step 5, you created a document property. A column property can be attached to more than one document property. A column can have more than one column property. Go to the Data menu, select Column Properties, and then select one of the columns in your drop-down, scroll to the bottom, and you will now see DropDwon1Options as a column property.
- Now, move the columns that you want to appear in the drop-down from left to right.

- Finally, click OK
- And, one more time…Click OK
Connecting the Property Control
Now that you have created the property control, you must connect it to something.
You can connect property controls to any selector on a visualization (x-axis, y-axis, color by, marker by, trellis by, etc), which means, you are giving users the ability to change what appears on a visualization with a drop-down control. This provides a tremendous amount of flexibility in an analysis. So, let’s look at how to do that. There are two ways to connect property controls to visualizations.
The Easy Way
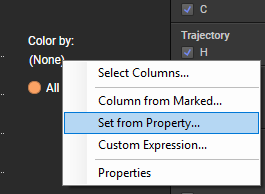
First, let’s go the easy way. Simply right-click on the selector and select Set from Property. Then, choose the property control from the list.
Writing the Syntax
Now, let’s look at how to write a custom expressions, which is what Spotfire does when you select Set from Property. Here is what the syntax looks like.
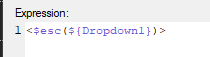
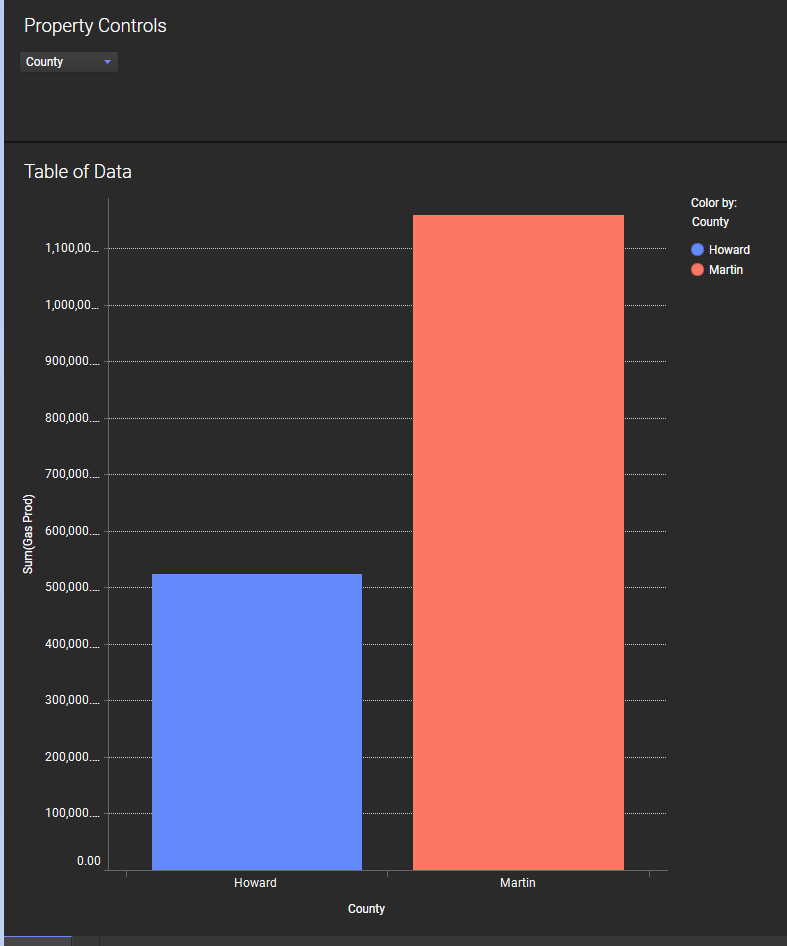
Notice the use of the $esc function. This function makes sure that Spotfire reads the string value passed thru the property control as a column name by wrapping it in square brackets. The syntax for the property control itself is a dollar sign, followed by the property control name, wrapped in squiggly brackets. The greater than/less than signs specify the data is categorical. If you were to add this property control to the x-axis (categorical axis) of a bar chart and then remove the < and >, the visualization would treat the data as continuous rather than categorical. Here is what my final result looks like. And now you know how to create drop downs in Spotfire!
Spotfire Version
Content create with Spotfire 10.3.
Pingback: Use IronPython to Navigate Spotfire Pages » The Analytics Corner
Pingback: How to Use List Boxes in Spotfire Text Areas » The Analytics Corner
Pingback: Error - Spotfire Could Not Publish » The Analytics Corner
Pingback: How to Use List Box (multiple select) in Spotfire Text Areas » The Analytics Corner
Pingback: How to Use Input Property Controls in Spotfire Text Areas » The Analytics Corner
Pingback: Using Input (multiple lines) Property Controls in Spotfire Text Areas » The Analytics Corner
Pingback: How to Connect A Spotfire Display Name To A Property Control » The Analytics Corner
Pingback: Using Slider Property Controls in Spotfire Text Areas » The Analytics Corner
Pingback: Export a Filtered Table with Spotfire Automation Services » The Analytics Corner
Thank you for your efforts to write the blogs.
I’m trying to follow the examples in your posts.
I hope that I can do the examples with the same data with yours.
Where can I download the data files in your posts?
I don’t have sample data files available. Many of them I wrote years ago and just don’t have the data anymore.
Thank you.this is useful for my interviews.
Nice. Glad I could help.
What if you want multiple columns in the Y axis (like for a cross table) how can you connect more than one for each drop down selection?
You would use the map function. Check out this post – https://www.bigmountainanalytics.com/esc-and-map-functions-spotfire/