This post concludes my series on learning how to use Spotfire property controls. Yay! We will end the series with a tutorial on how to use slider property controls in Spotfire text areas. This post will feature three use cases, two involving numbers and one with strings. Read on to learn more about using label property controls in Spotfire.
One Small Favor
It’s always my goal to help people solve problems in Spotfire, and I want my content to be as good as possible. Would you do me one small favor and leave a comment at the bottom ranking this post on a scale of 1 – 10 (1 = horrible, 10 = perfect), and if it’s anything less than 10, tell me what I could do to make it better.

What To Do With It?
All property controls are essentially containers for text and numbers. The slider property control stands out from others because the developer can set a numeric range (when dealing with numbers), and the developer can also control the increment. So, when would you use a slider with text? Sliders can be used to create hierarchies. But, why would you add a slider to a text area rather than just the hierarchy column itself? Well, you can use a slider property control to build a hierarchy without creating another column of data. Ahha!
As always, we start with how to create the property control, and we’ll begin with numbers.
Creating Slider Property Controls for Numbers
The steps below show you how to create a slider from within a text area.
- First, add a Text Area to your page.
- Right-click on the Text Area and select Edit HTML. You can also select Edit Text Area, but once I learned to use HTML and avoid the GUI, I stopped using Edit Text Area.
- Click the Insert Property Control button and select Slider.

- Click the New button.
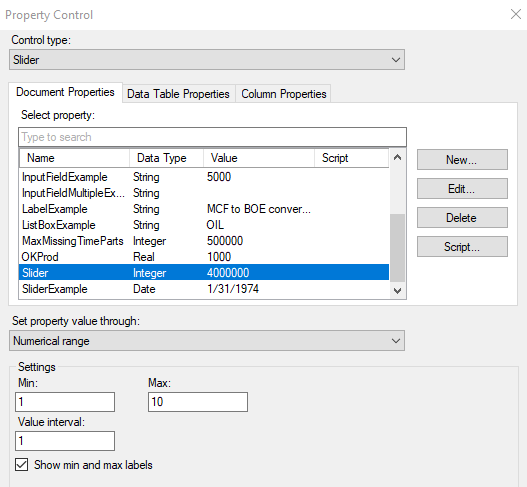
- Name the property control and set the data type for the data you are working with. Choose a numeric data type like Interger or Real.
- Set the property value thru Numeric Range and set min and max values as desired, as well as the desired value interval or increment.
- Click OK until you are out of all dialogs.
Now that we know how to create the slider, let’s use it in a visualization.
Using Numeric Sliders
In this example, I’ll show you how to control a visualization’s color using the slider. And just for fun, we’ll use the same control to also move a reference line. The image below is my starting point. I created a slider property control with a min of 0 and a max of 16 million. The slider has a value interval of 2 million.

Using Slider Property Controls for Color
- Right-click on the visualization and go to Properties. Go to the Colors menu.
- Click Add Point.
- Click the down arrow on the point to bring up the menu. Select Custom Expression.
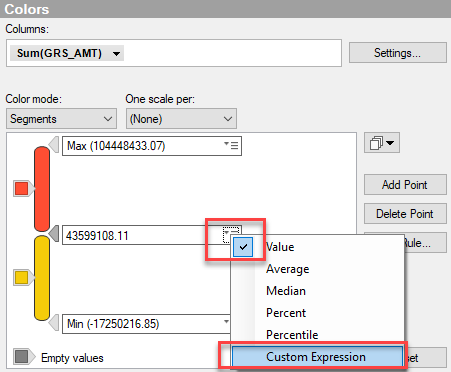
- Find the property control in the Available properties for column menu and click Insert Properties. Then, click OK and exit all dialogs.

And now, the visualization’s color is connected to the slider. Hit play to watch a demo.
Connecting the Slider to a Reference Line
Just as we connected the slider to color, we can also connect it to a reference line.
- Right-click on the visualization and go to Properties. Go to the Lines & Curves menu.
- Click Add, Horizontal Line, Straight Line.
- Set the radio button to Custom Expression and click Edit.
- Find the property control in the Available properties for column menu (exactly as done above) and click Insert Properties. Then, click OK.
- Format the line as desired. Click Close to exit.
And now, the reference line is also connected to the slider. Click play to see a demo.
So, at this point, I have showed you how to create a numeric slider and use it to control colors and reference lines. Sliders can also be referenced in custom expressions and calculated columns any time you need to use a number in the exact same way as shown in these two examples.
Now that you know how to work with numbers and sliders, let’s look at sliders when used with string data.
Using Slider Property Controls for Strings
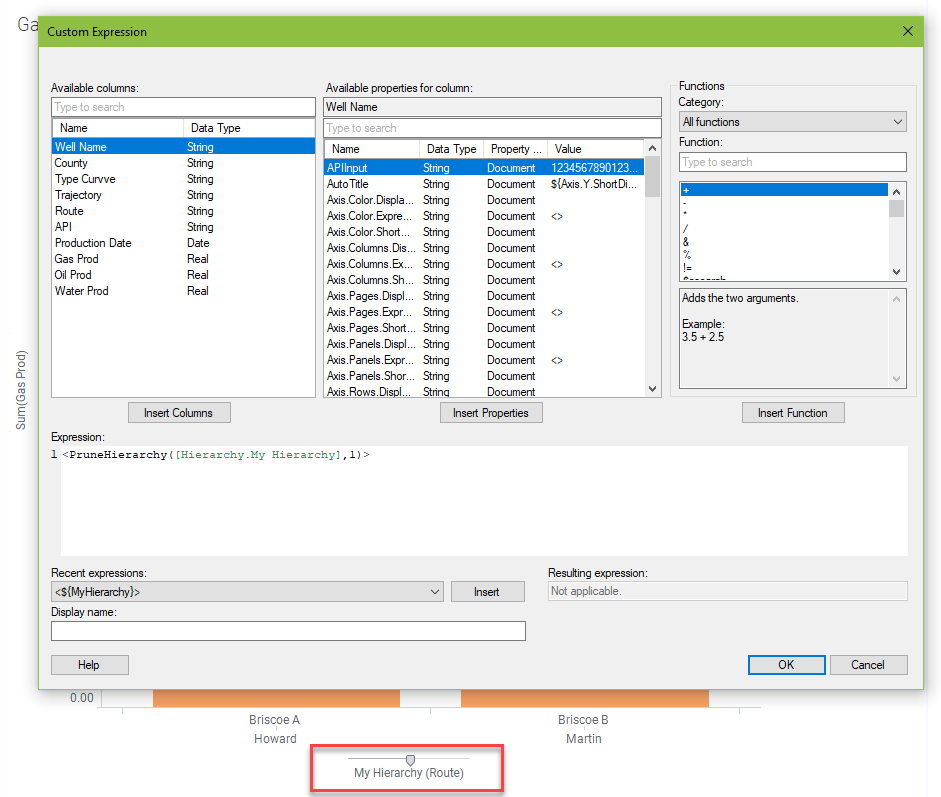
Before I show you the steps, let’s look at the custom expression behind a very simple bar chart with a hierarchy column on the x-axis. This will make sense of the syntax used with the slider.
In the screenshot below, I have created a hierarchy called My Hierarchy and added it to the x-axis. To get this shot, I right-clicked on the hierarchy and selected custom expression.
Hierarchies use the syntax “PruneHierarchy” and a number that indicates where you are in the hierarchy. The number zero represents the top-level of the hierarchy, and Spotfire counts up from there. Because my hierarchy is at the second position or second level, the syntax says 1. Now, we are doing to use this exact syntax when creating the slider, so if you are following along, copy the expression.
The steps below show you how to create a slider to be used as a hierarchy.
- First, add a Text Area to your page.
- Right-click on the Text Area and select Edit HTML. You can also select Edit Text Area, but once I learned to use HTML and avoid the GUI, I stopped using Edit Text Area.
- Click the Insert Property Control button and select Slider.
- Click the New button.
- Name the property control and set the data type as String.
- Set the property value thru Expressions. Now, paste the expression into the Expression column and update the number for each level of the hierarchy. Add display names as desired. The display name will appear on your slider in the

- Click OK until you are out of all dialogs.
Hit play for a quick demo.
And there it is! Now you know how to use slider property controls in Spotfire text areas. I hope you enjoyed this series! Please feel free to leave a comment below.
Other Sweet Spotfire Content
Check out my series on learning to use property controls.
- How to Create Drop-Downs is Spotfire Text Areas
- Create List Boxes in Spotfire Text Areas
- How to Use List Box Multiple Select in Spotfire Text Areas
- Using Input Property Controls in Spotfire Text Areas
- How to Use Input (Multiple Lines) in Spotfire Text Areas
- Using Label Property Controls in Spotfire Text Areas
All your posts are very helpful! Rating = 10!
Thank you!